Remotely accessing a router's administrative page using SSH tunnels
10 de Setembro de 2015, 0:00 - sem comentários aindaBefore moving to the UK, I left a Raspberry Pi running on my parent's home back in Brazil. It's working as a personal server for Asterisk and a few other uses. As it's not directly connected to the Internet, I had to forward a few ports on my router to be able to SSH into it. The issue happened when I needed to change these configurations.
For security reasons, I didn't activate the router's "Remote Management" functionality, so its admin page is only accessible through the local network. Luckily, I can access this page through the Raspberry Pi using a SSH tunnel.
SSH Tunnel
SSH allows us to redirect the traffic the received in a port in your local machine to another port in another machine. It works like:
YOU --------> MIDDLE-MACHINE --------> DESTINATION
This is a SSH tunnel. This can be seen as a simple VPN or a proxy. It allows us to connect to any machine that the MIDDLE-MACHINE is able to, with the useful side-effect of encrypting all traffic between us and the MIDDLE-MACHINE. In my usage, this schema looked like:
My notebook --------> Raspberry Pi --------> Router
The command needed to create this tunnel is:
ssh -N -L 3000:ROUTER-IP:80 RASPBERRY-PI-IP
This will open the port 3000 on my notebook which, when accessed, redirects the traffic to the router's port 80 going through my Raspberry Pi. I selected port 3000 arbitrarily, it could've been any other free port. The "-N" option is to avoid opening a shell connection to the Raspberry Pi, you can safely leave it out.
After running this command, I can access the router's administrative interface by going to http://localhost:3000.
Hard-coded redirects
Although I was able to access my router's admin page, I had another problem: upon log in, it would redirect me to http://192.168.0.1. This address is outside of the tunnel, so it didn't work (404 error).
To solve this, I had a simple idea: modify my notebook's local IP to 192.168.0.1 and create the tunnel on the local port 80 (instead of 3000). To do this, I needed to do:
sudo ifconfig eth0 192.168.0.1
sudo -E ssh -L 80:192.168.0.1:80 RASPBERRY-PI-IP
I had to use sudo because Linux doesn't allow regular users to open ports
below 1024. I used sudo -E because I connect to the Raspberry using SSH keys,
which are on my user (and not on root). What sudo -E does is preserve the
current environment's variables, which makes SSH to keep using my user's keys.
SSH Tunnels on other network interfaces
By default, SSH only creates tunnels on the local interface (i.e. localhost). This is a safety measure, to restrict others on the same network as you (or worse, the Internet) from using the tunnel. To force SSH to bind on the actual interface, we have to do:
sudo -E ssh -L 192.168.0.1:80:192.168.0.1:80 RASPBERRY-PI-IP
This creates a tunnel on the local interface 192.168.0.1:80 to the machine at 192.168.0.1:80 at Raspberry Pi's network.
That's it! We can now access the router's administrative page as if we were on the local network.
Continuous Integration for Android Apps with Jenkins and Maven3
21 de Julho de 2011, 0:00 - sem comentários aindaPre-requisites
- Ubuntu (I’m using 11.04)
- Jenkins (I’m using v1.4.21)
- Android SDK (I’m using r12)
- Git
Installing Xvnc
We need to run Android’s emulator to test the interface. For such, we need a X server running on the machine. The easier way to do so on a headless box is using Xvnc. To install it, do:
$ sudo apt-get install vnc4server
If you don’t have a window manager (GNOME, KDE, etc.), install fluxbox, a lightweight WM:
$ sudo apt-get install fluxbox
After this, we have to set a password for the vncserver.
$ sudo su jenkins
$ vncserver

You will require a password to access your desktops.

Password:
Verify:

New 'luna:1 (jenkins)' desktop is luna:1

Creating default startup script /var/lib/jenkins/.vnc/xstartup
Starting applications specified in /var/lib/jenkins/.vnc/xstartup
Log file is /var/lib/jenkins/.vnc/luna:1.log
Configuring git
We need to configure Jenkins’ user git name and e-mail. To do so, open a terminal and do:
$ sudo su jenkins
$ git config --global user.name "Jenkins"
$ git config --global user.email "jenkins@no-email.com"
Configuring Jenkins
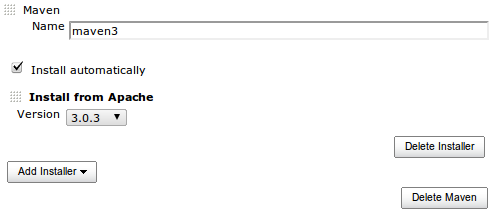
If you haven’t changed Jenkins’ configurations, it’s server is listening at http://localhost:8080. Open it and click into Manage Jenkins -> Configure System. Scroll down to the Android subsection, and write your Android SDK path into the text input. Then, find the Maven subsection, click into Add Maven and set the values as:

Also, go to Jenkins’ main page then Manage Jenkins -> Manage Plugins and, at the Available tab, look for the plugins Hudson Xvnc, Jenkins Zentimestamp, Android Emulator and Jenkins GIT. Check every one of them and click Install. At the following screen, check Restart Jenkins when installation is complete and no jobs are running.

Adding a project to Jenkis
We’re going to add the morseflash example from maven-android-plugin samples to our Jenkis, to check if everything is configured properly.
- Download the samples from https://github.com/jayway/maven-android-plugin-samples/tarball/alpha;
- Extract into /tmp (or any other folder) and rename jayway-maven-android-plugin-samples-3fe4aed to samples (just to make it easier);
- Create a git repository inside the morseflash subfolder using: $ git init $ git add * $ git commit -a -m "Initial commit."
- Edit the line 16 in pom.xml, changing from ${maven.build.timestamp} to ${BUILD_ID};
- Open http://localhost:8080 and click in New Job;
- Write “morseflash” in Job name, select Build a maven2/3 project and click OK;
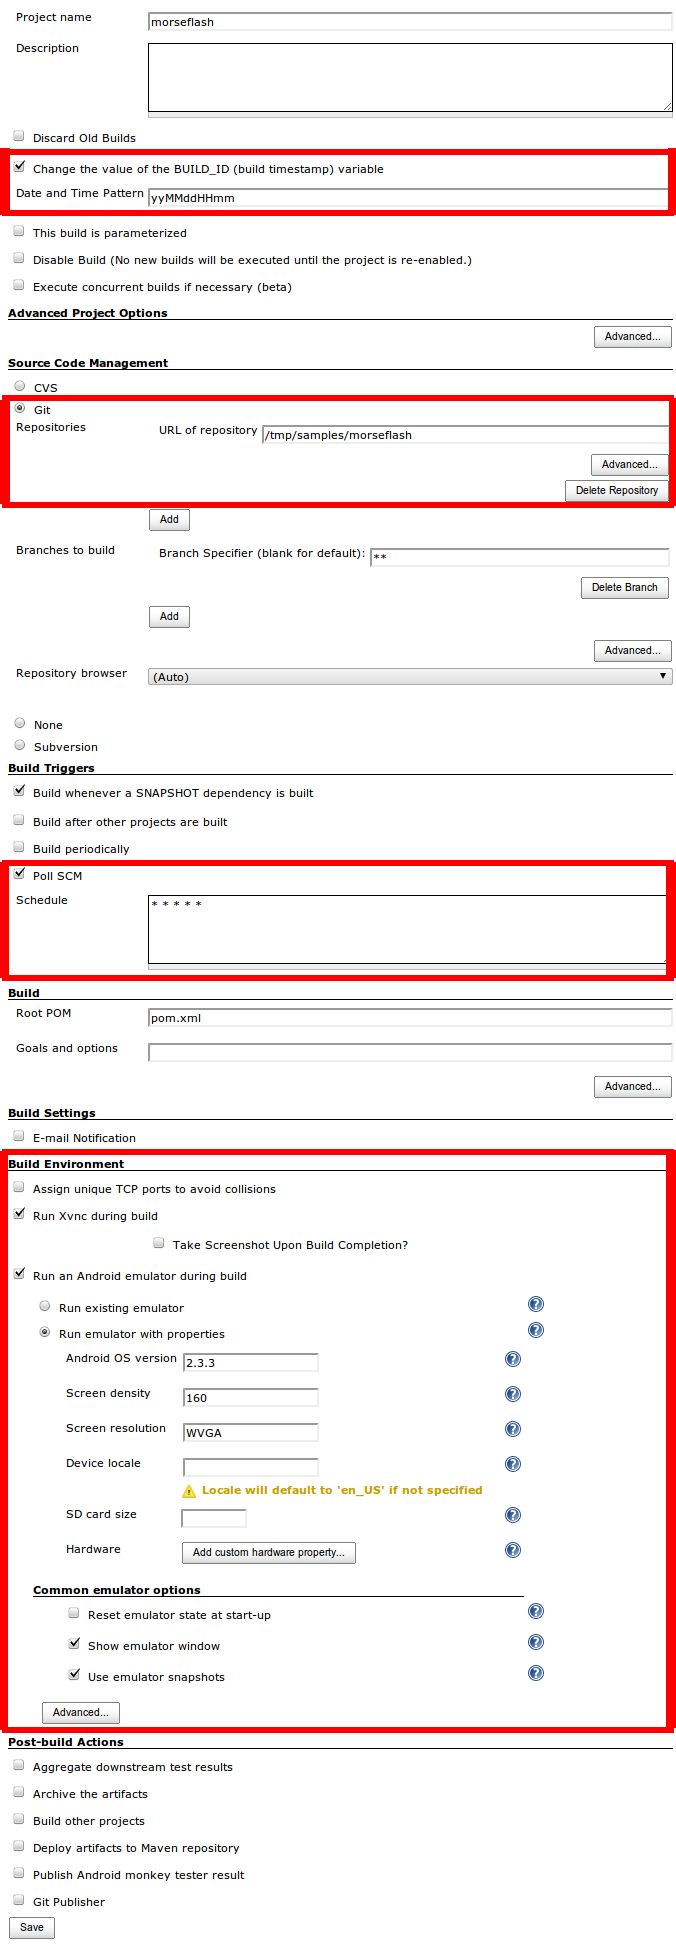
- Configure it like the following image and click Save:

After this, you can wait a little bit and Jenkins will automatically build the first version, or you can click in Build Now. Either way, a new build will appear at the Build History block in the bottom left of the page:

Click on its link, then click in Console Output. You should see a lot of messages passing by and, in the end, you should see something like:
[INFO] ------------------------------------------------------------------------
[INFO] Reactor Summary:
[INFO]
[INFO] MorseFlash Parent ................................. SUCCESS [1.319s]
[INFO] MorseFlash - Library .............................. SUCCESS [5.048s]
[INFO] MorseFlash - App .................................. SUCCESS [4.028s]
[INFO] MorseFlash - Instrumentation Test ................. SUCCESS [12.702s]
[INFO] ------------------------------------------------------------------------
[INFO] BUILD SUCCESS
[INFO] ------------------------------------------------------------------------
[INFO] Total time: 25.714s
[INFO] Finished at: Thu Jul 21 14:05:31 BRT 2011
[INFO] Final Memory: 19M/197M
[INFO] ------------------------------------------------------------------------
channel stopped
[android] Stopping Android emulator
[android] Archiving emulator log
Terminating xvnc.
$ vncserver -kill :10
Killing Xvnc4 process ID 25580
Finished: SUCCESS
Bingo! You now have a Continuous Integration infrastructure for Android apps. Every minute Jenkins pools git and, if it finds something new, rebuilds everything. If something goes wrong, check if you did all the steps of the tutorial. If you can’t figure it out, ask a question in the comments section and I’ll try to help.
References
- Installing the Android SDK
- Installing Jenkins on Ubuntu
- Maven Android Plugin
- Run UI tests on a headless Jenkins / Hudson Continuous Integration server running Ubuntu
Meu ambiente de desenvolvimento em 7 itens
4 de Fevereiro de 2011, 0:00 - sem comentários aindaPor acaso, estava lendo o blog do @mauriciojr e descobri que ele me convidou pra essa brincadeira.
Máquina/SO
Uso meu notebook, um Asus G50Vt-X5, com Ubuntu 10.04 para todas minhas tarefas. De alguns anos pra cá, virei adepto do uso de dois monitores. Já não consigo mais viver sem. Uso o do notebook, de 15.4", com um LG de 22" conectado via HDMI.
Editor/IDE
Sempre fui adepto do Vim. Há uns tempos, dei uma olhada no Emacs, até trabalhei e gostei um pouco com ele, mas acabei voltando as origens.
Quando estava brincando com desenvolvimento pro Android, usei o Eclipse. Mas, para todo resto, Vim na cabeça.
Terminal
Terminator! É um software que roda vários terminais em uma única tela, dividindo-a verticalmente ou horizontalmente. Antes de conhecê-lo usava o Screen para isso, mas achei o Terminator bem melhor.
Browser
Chrome para o dia-a-dia e Firefox com os plugins básicos Firebug, WebDeveloper e YSlow para debug.
Software
Além dos que já falei (e dos que ainda vou falar), meu computador sempre está com o Docky, Gnome-Do e Pidgin abertos, e o Miro para acompanhar algumas séries.
Source code
Normalmente todos meus projetos estão sob controle de versão do Git e, os que preciso fazer backup ou receber contribuições, mando pro gitorious.
Música
Antigamente (quando meu notebook tinha 512 MB de RAM) usava o MPD e NCMPC para indexar e tocar músicas. Agora uso o Rhythmbox mesmo, mas sinto falta de poder navegar pelos diretórios das músicas, e não pela organização do próprio Rhythmbox.
Para continuar a brincadeira, eu indico o @fernandosmb, @jrmb e @barbarodrigo.
Comprimindo o diretório /usr (Ou como instalar o Ubuntu 10.04 em menos de 1.5 GB)
21 de Janeiro de 2011, 0:00 - sem comentários aindaNo natal passado dei para minha namorada, Samara, um netbook: o Asus EeePC 2G Surf. Ele foi o primeiro netbook lançado, com processador de 800 MHz, 512 MB de RAM e 2 GB de SSD. Infelizmente, para diferenciá-lo de modelos mais caros, alguém na Asus teve a ideia imbecil genial de soldar a memória RAM e o SSD. Ou seja, é impossível fazer um upgrade nele.
Passei meus dias antes do natal de 2009 pesquisando como instalar um Sistema Operacional usável com essa limitação de espaço. A instalação do Ubuntu, pelada, gastava mais de 4 GB. Depois de algumas noites mal dormidas, consegui instalar o Xubuntu 9.04 capado, com um browser minimalista (Midori) e algumas coisas mais. Ficou usável, mas longe de bom. Mais de um ano depois, finalmente tomei vergonha na cara de fazer direito.
Comprei um cartão MicroSD de 8 GB e fui instalar o Ubuntu 10.10 nele. Consegui sem muito esforço, simplesmente colocando o / no SSD de 2 GB e o /usr e o /home em duas partições no cartão de memória. Ficou legal, gostei da interface Unity, e tava tudo funcionando. Quando mostrei para ela, depois de brincar por uns 30 segundos, ela disse: "Tá muito lento!".

Ok, segunda tentativa. Levei o netbook para casa e fui falar com Deus. Descobri que a Unity é realmente mais pesada, e era melhor usar o Ubuntu 10.04 Netbook Edition. Mas, se o problema dela era velocidade, pesquisei mais um pouco sobre como otimizar. Foi aí que encontrei o ótimo blog do Steve Hanov, onde ele dá 4 dicas para otimizar o Ubuntu quando ele for usado em de um drive USB. Neste post só vou falar da terceira dica (a mais importante para mim): comprimindo os arquivos.
O diretório /usr é normalmente o maior diretório de uma instalação do Linux. Nele ficam todos os binários dos programas instalados, bibliotecas, códigos-fonte, etc.. Para se ter uma ideia, quando instalei o Ubuntu 10.10 no netbook da Samara, o /usr tinha cerca de 1.8 GB, enquanto todas as outras pastas juntas não chegavam a 700 MB. Então, se queremos diminuir o tamanho de uma instalação, nada mais lógico que começar com o maior culpado.
A ideia é comprimir a /usr. Para isso usamos o squashfs. Com ele, criaremos um sistema de arquivos comprimido, virtual, somente leitura. Conseguimos diminuir a pasta para cerca de 700 MB. Mas, para não ficarmos com a /usr somente leitura, usamos também o aufs2. O que ele faz é simular uma partição de leitura e escrita em cima da criada pelo squashfs. Ele faz isso criando uma “camada” em cima da partição /usr. Quando tentarmos ler um arquivo de lá, o aufs2 vai nos mostrar o que foi comprimido com o squashfs. Se tentarmos criar um arquivo, ele o cria em uma outra pasta (que vamos definir), mas nos mostra como se tivesse criado na /usr, nos dando a ilusão que essa partição é de leitura e escrita, quando não é. Não se preocupe com esses detalhes técnicos. Tudo vai ficar mais claro conforme fomos fazendo (espero).
Antes de tudo, instale o pacote squashfs-tools:
sudo apt-get install squashfs-tools
Depois adicione as seguintes linhas ao arquivo /etc/modules:
squashfs
loop
Crie as pastas onde irão ficar as partições virtuais squashfs e aufs2:
sudo mkdir -p /squashed/usr /squashed/usr/ro /squashed/usr/rw
Comprima a pasta /usr em uma imagem dentro de /squashed/usr:
sudo mksquashfs /usr /squashed/usr/usr.sqfs
Adicione as seguintes linhas ao arquivo /etc/fstab:
/squashed/usr/usr.sfs /squashed/usr/ro squashfs loop,ro 0 0
usr /usr aufs udba=reval,br:/squashed/usr/rw:/squashed/usr/ro 0 0
Reinicie o computador. Tudo deve funcionar normalmente, então você pode apagar o diretório /usr, fazendo:
sudo umount /usr
sudo rm -rf /usr
Se houve algum problema, tente voltar para os passos anteriores e descobrir o que deu errado. Qualquer coisa mande um comentário que tentarei ajudar.
Um bônus de comprimir seu /usr é que, além de ocupar bem menos espaço, o computador ficará mais rápido. As máquinas de hoje em dia têm processadores muito mais velozes que os discos, então um tempo maior é gasto lendo um programa no HD do que executando-o. Como os programas estão comprimidos, precisa-se ler menos dados, tornando o computador mais rápido.

No final, o Ubuntu 10.04 está ocupando menos de 1.5 GB do SSD do netbook, que ganhou mais uns anos de vida útil com a Samara. Eu não fiz benchmarks, mas a diferença é visível. Ele está levando 1m30s para iniciar, mais 10s para abrir o Chrome e 30s para abrir o OpenOffice.org. Nada mal para um netbook de 2007
Este post foi baseado no Optimizing Ubuntu to run from a USB key or SD card e Speed up system with aufs + squashfs.
Reportagem sobre a Maratona Internacional de Dados Abertos no Jornal da Paraíba (JPB)
4 de Dezembro de 2010, 0:00 - sem comentários ainda
Seu browser não suporta HTML5. Veja a reportagem no site do jornal.
